|
|
| data... any distance... minimal time |
Writing VFP apps for multiple back-end databases - a case studyBy Colin Nicholls Information in this article has appeared elsewhere in various forms including session notes for dFPUG's developer's Konferenz session notes in 1998. IntroductionTransparent access to many different types of back-end databases has been a promise of Visual FoxPro’s view technology for a number of years now. However it was not until recently (over the last year and a half) that I personally was able to test this ability of Visual FoxPro in a real world application. My company was introduced to a new client who was embarking on an ambitious task: that of writing a new 32-bit Windows version of his successful DOS-based, non-Xbase vertical-market application. Most of his existing clients would have been happy with storing their data in regular Xbase tables, but one of them (who just happened to represent half his business), due to a "corporate directive", required that their data be stored in SQL Server. It was either that or they would find another application vendor. Not surprisingly, our new client started looking for a suitable development platform, and chose Visual FoxPro, largely due to the marketing material that (rightly) promoted this feature. Unfortunately for our client, he had never programmed in a Windows-compliant development language before, let alone object-oriented VFP! That was where we came in. We were employed as contractors with technical expertise to assist our client to produce the new Windows version of his application – one that would be able to transparently store data in VFP tables, or a SQL Server database. The project was subject all the usual challenges of this type of development effort: it took longer that we thought; we found better ways to do things as work progressed and ended up re-working stuff; he had never worked with other programmers before and some of his ideas were strange… as interested as you no doubt are in these details, I am going to avoid talking about them because they will distract from the primary goal of these notes, which is to cover the issues we dealt with while developing the application. I will spoil the suspense at this point and say, yes, we did manage to write the application, and it is currently being deployed successfully at both SQL Server sites and Fileserver LANs. That’s all I want to say about that project, but despite this I have still titled this session "a case study". I did this because I want to stress the point that the solutions and strategies I describe below are only one way of solving the problem. I don’t want to claim that they are the only way doing cross-database-platform development in VFP. They worked for us in our specific situation, but there may be better ways. Other projects will have other requirements that may require different solutions. At the time of working on this project, I was using Visual FoxPro 5.0a and SQL Server 6.5. As I write this, I am using Visual FoxPro 6.0 and beta 3 of SQL Server 7.0. As a result, I expect some things to be different, but this may be a good chance to identify the benefits (or disadvantages!) of moving to these later versions. In these notes I would like to:
In the process, we will look at a few specific problems that we had, along with the solutions that we developed. Concept reviewIt’s hard to judge at this time what level of knowledge my audience has, so rather than ignore those of you who may not have encountered views or are new to SQL Server, I have included a quick run through the basics in Appendix A. I will however have to assume that you:
Determining a strategyHaving examined the possibilities of views, remote views, and accessing SQL Server data in VFP, and the features of the Upsizing Wizard, our development team put our heads together and came up with a set of rules and guidelines to follow as we started developing the application:
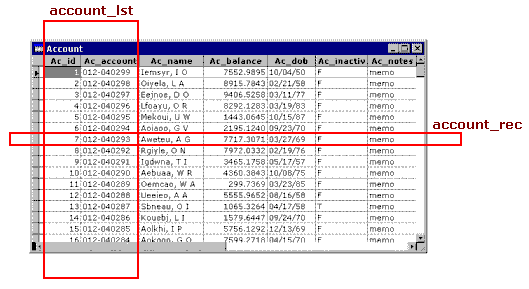
Use views for data updates, SPT for queriesWe started out deciding to use views exclusively for data access throughout the application. We figured that we could use two views per table: a vertical slice through the table for picklists, and a horizontal slice, a single-record updateable view for updating the data. (See Figure 1.) But in practice, as development got under way, we discovered that the number of views required was going to be many more than two per table in most cases. We experimented with SQL Passthrough (SPT) and discovered that for many read-only queries it was noticeably faster to use SPT than to use an equivalent remote view. We obtained the best performance by mixing SPT for miscellaneous queries with remote views for updating data. Views have other, different advantages over SPT queries, as we will discuss later on in these notes. We ended up having a mixture of updateable and non-updateable views, both single record slices and vertical lists, and SPT queries. Naming conventionsWe decided to name views in the DBC by which table they were primarily querying, with an added suffix to indicate their use: _rec for single record slices of a table, and _lst for vertical columns of one or more fields. (See Figure 1.) A typical example might be account_lst_by_name. Use separate DBCs for local and remote operationWe would define local views in a "local" DBC, and define identically named remote views in another "remote" DBC. In this way, we hoped to be able to enable the application to switch from using VFP tables to SQL Server data by just configuring it to open a different DBC.
Figure 1. View naming conventions Use the DBC as a container for platform-specific resourcesAny database platform-specific code would be placed in different sets of stored procedures stored in the appropriate DBC. This stratagem is crucial to being able to have a single codebase (without numerous CASE… statements throughout the source bracketing platform-specific code) running transparently on the different databases platforms. I’ve included some brief documentation of the basic set of 13 functions that made this possible in Appendix B. We’ll be using some of them later on. Use one application-specific login id on SQL ServerTo simplify installing and administering the application on a variety of client networks, we decided to try and use one single login Id on SQL server for all instances of the application. So far no problems have been reported with this. Application performance is reportedly good, and it has been much easier to administer the installed systems. (Security is taken care of in the business tier of the VFP application.) Open tables programmatically in the Load() rather than use the Data EnvironmentOur development team was made of both experienced VFP developers, and otherwise experienced developers with no Visual Foxpro or object-oriented programming experience. I explained to the other members of the team about the Data Environment, and how in the past we have had trouble making our forms handle data from different datasets, and problems with hard coded explicit paths to tables. After some discussion we decided to agree to write programmatic code to open the required views in the Load() event. However: my opinion at this time is that VFP 5.0 and 6.0 are much improved over 3.0, and I’ve had a lot of success using the DE to open tables. If I were to work on a another, similar development project today, I would recommend using the DE. So, in the example application below, we will be using the DE rather than programmatically opening the views in the load. We'll be demonstrating how to configure the data environment objects at run time to reference the appropriate DBC. Applying the strategyLet’s work through an example, in which we will:
Creating some sample VFP dataLet’s start with a regular VFP database, populated with sample data. Note: I've made the files referenced and created in this article available in an associated zip file, available here in sqlsrc.zip In the sample\data directory, there is a program called CreateSampleData.prg. You can run it to create the sample data used in this session. I wrote the program because I needed a suitable quantity of test data to make this example something other than a "trivial" case. And besides, generating sensible but meaningless test data is always fun.
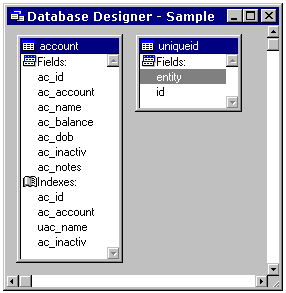
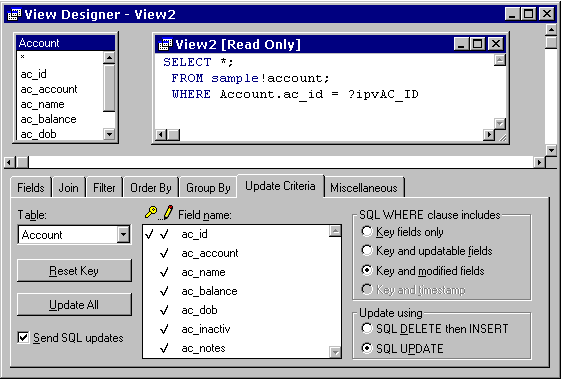
Figure 2. The Sample data The data we are going to use in our sample application is shown in Figure 2. In our example database – called, appropriately enough, Sample - We have a simple table called Account, containing information about bank accounts. Our factless primary key here is an integer field, and we have a system table called Uniqueid that contains a record that allows us to obtain successive unique ids for new records. You can’t get much simpler than that! L_SAMPLE, the local view DBCLet’s call our local view DBC L_Sample. (Later on, we’ll call our DBC of remote views R_Sample). Using the strategies described above, we know that we will need several views. CREATE DATABASE l_sample Account_recLet’s define the account_rec view that we will need in order to display the fields from the Account table, and navigate from record to record (See figure 3). Tip: Use a naming convention for view parametersIn order to ensure that different programmers clearly understood which variables were view parameters, we decided on a naming convention. We used a prefix of lower-case xpv on the field name, where x represents the variable datatype, and pv stands for "parameterised view". So, in the case of the account_rec parameterized view, the integer field AC_ID is parameterised by "ipvAC_ID". Seeing as this view will retrieve all fields from a single record identified by its primary key value, we’ll make the view a parameterized view by specifying a filter clause of WHERE Account.AC_ID = ?ipvAC_ID.
Figure 3. Creating the Account_Rec view Remember to identify the key field, mark the fields as updateable, and check the "Send SQL updates" checkbox. Account_lstLet’s create another view that we can use for a picklist. We will need all records, but only a couple of fields: the primary key and a description field. We’ll do this one programmatically: open database l_sample create sql view account_lst as ; select ac_id, ac_account from account order by ac_account Local stored proceduresHaving created a couple of views for "local" data access, we also need to add some platform specific code to the DBC in the form of stored procedures. Among DBC-level data validation or similar kind of routines, for this sample there is one stored procedure we need to add to the local dbc: sp_GetNewId(). This routine will return the next available unique ID from the uniqueid table, for insertion into a new record. For the local DBC, we can use regular VFP table locking to ensure multi-user safety. (See sample\sp\local.prg for the implementation of sp_GetNewId() we used in our project.) Once we have implemented this stored procedure, we can use code similar to the following to create new records with new unique IDs: open database l_sample
use account_rec nodata
insert into account_rec fields ;
(ac_id, ac_account, ac_name, ac_balance, ;
ac_dob, ac_inactiv, ac_notes ) ;
values ;
( sp_GetNewId('account'), '', '',0.00,{},.F.,'')
=tableupdate(TABLEUPDATE_CURRENTROW)
Moving our data to SQL ServerIf you have never met SQL Server before now, I recommend that you have some other technical references on hand as you work through the rest of this article. (Unfortunately I do not have an "Introducing SQL Server data" appendix to refer you to.) How far can the Upsizing Wizard take us?I was pleasantly surprised at how capable the upsizing wizard in Visual FoxPro. Sure, it has its quirks. But we ended up using it on a regular basis to transfer data into SQL Server every time we tested our data conversion routines. So the answer to the question posed by this section's header is, "quite a long way". There are several steps we need to go through:
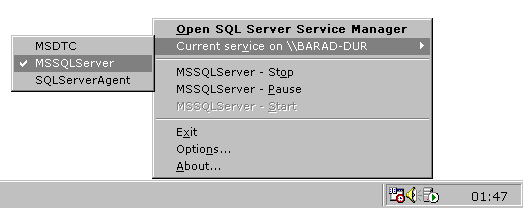
I realise that the upsizing wizard can actually do all four of these steps at once for you, but Colin's First Law of Wizard Use is, "Never let a wizard do something for you if you could learn something new by doing it yourself." The upsizing wizard is great for the repetitive boring parts of the task, but in this situation I welcomed the opportunity to learn about how to create these things manually in SQL Server. Introducing SQL ServerI've installed the desktop version of SQL Server 7.0 on this machine that I’m writing these notes on. The whole process went very smoothly, so I won't bother saying any more about it except that SQL Server 6.5 and 7.0 beta 3 must have their collation sequence specified at installation time. I chose the default "case-insensitive" sort order. After you have installed SQL Server and the SQL Server service is running (see Figure 4) you should be able to run the SQL Server Enterprise Manager. In version 7.0, the Enterprise Manager has been re-vamped as a "snap-in" to the new Microsoft Management Console. (See Figure 5.)
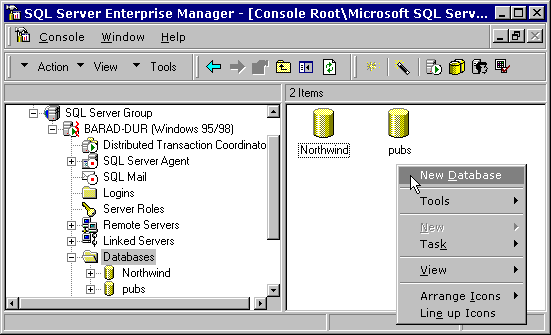
Figure 4. The SQL Server service running on Windows 98 Preparing the empty SQL Server databaseIn SQL Server 6.5, we had to deal with things called "devices", which were units of storage on disk in which SQL Server kept databases and other files – maintaining its own internal file system, almost like Doublespace volumes. Later versions have done away with devices, so I'm not going to say any more about them. To prepare a new empty database in SQL Server, we need to run the SQL Server Enterprise Manager; select the "databases" branch, and right-click to select New Database from the menu. (see figure 5.)
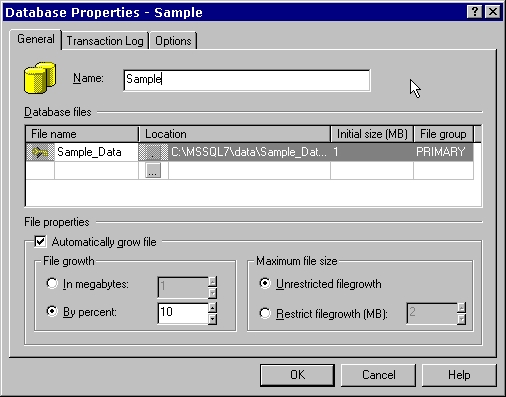
Figure 5. Creating a new database in Enterprise Manager This will display the new database dialog. We shall call the database "Sample" to match the vfp source data. We're going to leave all the settings in this dialog at their default values to start with.
Figure 6. New Database dialog After pressing the OK button, SQL Server takes a short time to create the database files on disk. After it has completed this operation, we should see the Sample database appear as an icon on the right-hand pane of the window. Creating a server login idA note about SQL Server’s Security modelsOn an NT Server we could have used "integrated security", where SQL Server looks at user accounts on the NT domain for access rights, and decides how to allow access to the SQL databases. In these notes and in my session I will use the standard stand-alone security model of SQL Server. This is for several reasons:
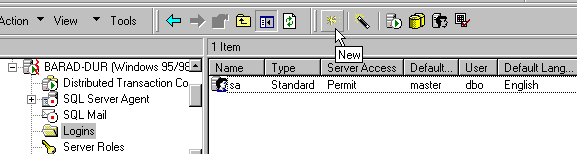
Logins versus UsersSQL Server actually has two different types of user ids. There is the LoginID that you log in to SQL server with; and then there is a database-specific UserID. The rights of the database User ID will govern your abilities within a specific database. This allows users to play different roles within different databases. In the case of Integrated NT security, your SQL Server Login ID will be the one that you logged in to the NT domain with, and you will probably never be prompted for it. But you will still need to be assigned a UserID for each database that you access in SQL Server. By default, the administrator LoginID sa does not have a password. Unless you are in a situation where security is not an issue, experts recommend assigning a password to this LoginID as soon as possible. Since my computer is named Barad-dur it seems logical that I should change the password for the sa LoginID to "sauron".[2] Under the standard security model, it is probably not a good idea to let our application log in to SQL Server with the sa LoginID. So we will create a LoginID especially for our sample application. We do this by clicking on the Logins branch in Enterprise Manager and select the New toolbar button with the "starburst" icon. (See figure 7.)
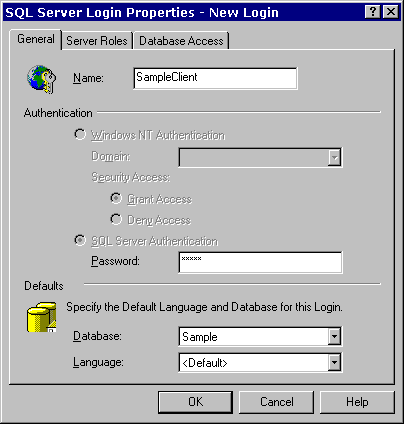
Figure 7. Creating a new login id. This will display the "New Login ID" dialog (See figure 8.):
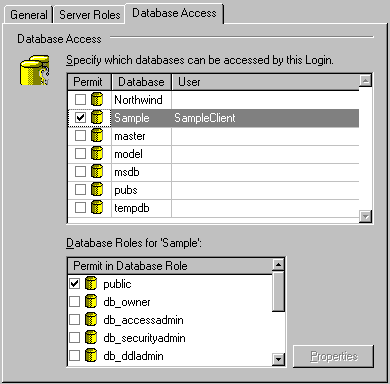
Figure 8. New ogin ID dialog Here we enter the LoginID name – SampleClient – and password. In keeping with the Tolkien theme of my computer, I will use the password "frodo"[3]. We can also specify the default database this LoginID will attach to: Sample. Before we close this dialog, we need to adjust the settings on the Database Access panel.
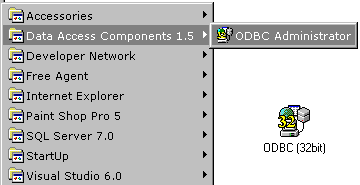
Figure 9. The Database Access panel By placing a tick against the Sample database, we can automatically create a corresponding UserID called "SampleClient" in the Sample database. Let's leave the other settings as they are and press the OK button to create the Login and User IDs. You can see the new Login ID appear in the Enterprise Manager window. Setting up an ODBC data sourceNow let's organise an ODBC data source for our new SQL Server database. This step will have to be performed on each machine that will be running our application, and we'll go through the manual process now, although there are ways of automating this - see the Win32 API docs, particularly the SQLConfigDataSource function in ODBCCP32.DLL. Run the ODBC AdministratorThis utility is either a control panel applet called "ODBC (32bit)", or if you have installed Visual Studio 6.0 recently, you'll also find it under a Start Menu program group called "Data Access Components".
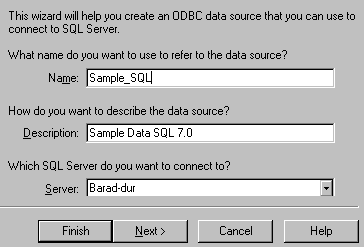
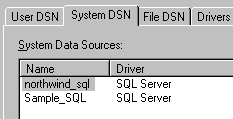
Figure 10. The ODBC administrator Run the ODBC Administrator, select the System DSN page, and press the Add button. For some reason, the SQL Server ODBC driver is the only one on my computer not prefixed with "Microsoft", so it is at the bottom of the list. We need to select it and press the Finish button. Now the "create a new data source to SQL Server" wizard surges into life.
Figure 11. The "create DSN" wizard (1) I don't think the value we type into the "description" field is used for anything important, but the "name" field will be what we use when referencing the Data Source Name (DSN), so we should put something sensible: I'll use Sample_SQL here. The SQL Server selection combo will have "(local)" in it if you are running SQL Server on your workstation. I'm not sure if it makes any difference or not [4], but I prefer to enter the actual name of the server computer – in this case, my computer name, Barad-dur. Now we can press the Next button.
Figure 12. The "create DSN" wizard (2) Now, the wizard needs to talk to SQL Server in order to configure the system DSN. This requires a LoginID, so we have to tell the wizard that we are using "standard security" and that the administrator LoginID is sa and the password is… whatever the password is. Important: This authentication information is not stored with the DSN – it is only used by the wizard as it configures the DSN. Pressing the Next button shows us the pages shown in figure 13.
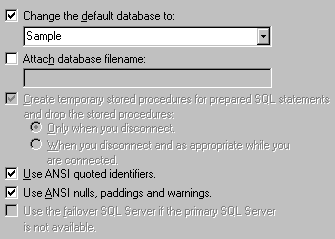
Figure 13. The "create DSN" wizard (3) Here, we can set a default database to use. This is not essential, but seeing as we are using the DSN for the purpose of accessing the Sample database, it seems reasonable. We can leave the other settings on this page at their default values for the moment.
Figure 14. The "create DSN" wizard (4) Page 4 of the wizard is shown in Figure 14, and I haven't bothered to change any of these settings from their default values. Some of them look interesting, but they're not important right now. Now we can press the Finish button, and observe our new DSN in the main ODBC Administrator list (See figure 15).
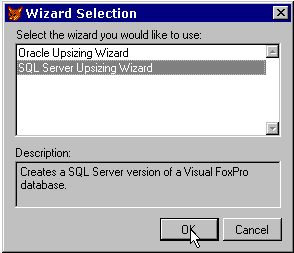
Figure 15. The newly created Sample_SQL DSN That is all we need to do before we start using VFP to access our SQL Server database. We can close the ODBC Administrator and run VFP. Running the Upsizing WizardThe next step involves using the Visual FoxPro Upsizing Wizard to move our VFP data into SQL Server. Select "Upsizing" from the Tools:Wizards menu. You should see the dialog shown in Figure 16.
Figure 16. Choosing an upsizing wizard We want to choose the SQL Server upsizing wizard, of course.
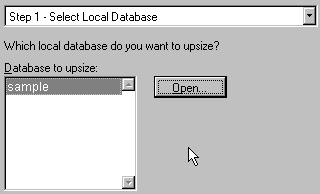
Figure 17. Opening the database to upsize As you no doubt recall, the VFP sample data is currently stored in the Sample DBC. Once we've ensured that it is open, we can move to the next step.
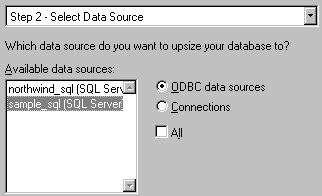
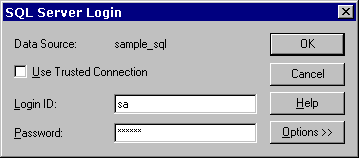
Figure 18. Selecting a DSN to upsize to Here the wizard presents us with a list of previously defined Data Source Names, including sample_sql, which we have just created. As the wizard uses the DSN to talk to SQL Server, we are prompted to enter a LoginID and password. As we are going to create tables, we should use a Login ID with sufficient access rights on the Sample database. In this case, sa.
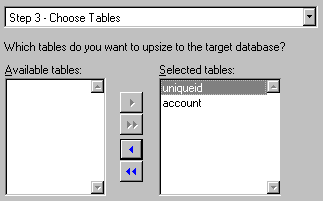
Figure 19. The wizard needs to log into SQL Server After logging in to SQL Server, the wizard prompts us to select which tables in the VFP Sample database should be upsized (See figure 20). The correct answer is all of them.
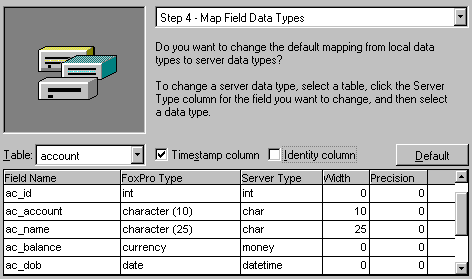
Figure 20. Selecting tables to upsize The wizard will take some time analysing the tables, and then move to the next step, which is assigning field data types for the SQL Server tables. It is clever enough to choose some default types for us, and most of the time, it gets it right.
Figure 21. Adjusting data types It is important to understand that there are some differences in what data types are available for our tables in SQL Server. For example, SQL Server does not support the DATE data type, so date fields are upsized as DATETIME. (This can cause some problems, as I'll mention later.) The Foxpro CURRENCY data type is roughly equivalent to the SQL Server MONEY data type. LOGICAL fields are upsized as BIT in SQL Server, and MEMO fields are assigned a TEXT data type. Note that in SQL Server 6.5 there was no easy way to change the structure of a table once it had been created. This may have changed in version 7.0, but it is still better to get the types correct prior to upsizing the database. Timestamp columns in SQL ServerYou may notice the checkboxes captioned "Timestamp column" and "Identity column" in figure 21. I'll talk about identity columns further down, but let's examine the "Timestamp column" now. SQL Server has an option to add a timestamp field to tables. A timestamp is a unique value generated by SQL Server during an update operation. This allows SQL Server to resolve update conflicts faster, by comparing the timestamp of the new record to the existing record. If the timestamps are identical, then SQL Server knows that the record can be updated. If the timestamps are different, then obviously the record has changed since the data was last read for editing. The upsizing wizard suggests using a timestamp column on those tables that contain a memo field. This is because comparing old and new values for text or image fields can be time consuming, and timestamp comparison is much faster. For tables without memo fields, a timestamp column could be unnecessary. At this stage, we are going to leave the Upsizing Wizards suggestions alone, and move on to the next step. Our application should not be affected – we will be ignoring the field except in our view definitions, where those tables that have timestamp columns may be set to use the "Key and Timestamp" SQL WHERE update clause, depending on performance issues.
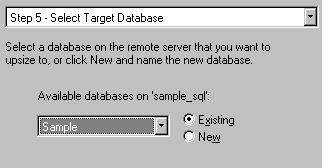
Figure 22. Select a database to upsize to Step 5 requires us to select the SQL Server database we are going to upsize to. We select Sample, naturally. We could have used the wizard to create the database for us at this point, but I prefer familiarising myself with the Enterprise Manager program and hopefully learning more by creating the database manually.
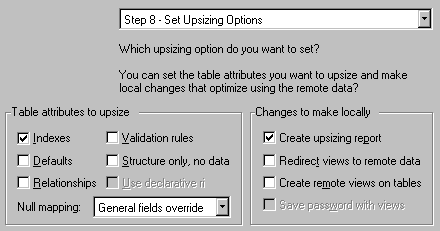
Figure 23. Setting upsizing options Selecting a Pre-created database means the wizard jumps directly to step 8, where we set upsizing options. In our simple example (and during the development of our vertical market application) we had no default values, relationships, or validation rules to upsize, so at this point we change the default settings of these options to that shown in Figure 23. At first glance it looks as though the "Redirect views to remote data" is what we want. But remember: SAMPLE.DBC does not contain any views. The local views are in L_SAMPLE.DBC. We also do not want the Upsizing Wizard to create remote views of the tables in SAMPLE.DBC, because it will create non-parameterised, full-record-width views that will be useless and slow.
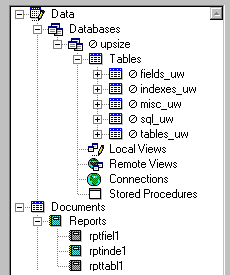
Figure 24. Ready to go… Normally, we wouldn't bother saving the SQL script that the Wizard generates, but if you haven't seen it before it is worth taking a look at it. Now we are ready to press the Finish button. You will see a progress bar as the upsizing process takes place. When it is done, we see a messagebox announcing "Upsizing Complete.", and a project called REPORT.PJX is opened containing a database called UPSIZE, plus some report forms. (See right.) The database contains several tables, each of which contains information generated during the upsizing process. In my opinion, these reports are next to useless, unless the upsizing process encounters errors which you need to research to find out how to resolve them.
Figure 25. REPORT.PJX In our case, we chose not to perform the upsizing functions that were likely to cause errors, so we didn't get any. If we had, there would be an additional table called errors_uw in the upsize.dbc. The script table SQL_UWIt is useful to examine the conents of the memo field in the sql_uw table. This field contains a log of the SQL script used by the upsizing wizard: /* This zero default is bound to one or more fields. */
CREATE DEFAULT UW_ZeroDefault AS 0
/* Create table 'uniqueid' */
CREATE TABLE uniqueid (entity char(8) NOT NULL, id int NOT NULL)
/* Create table 'account' */
CREATE TABLE account (
ac_id int NOT NULL,
ac_account char(10) NOT NULL,
ac_name char(25) NOT NULL,
ac_balance money NOT NULL,
ac_dob datetime NOT NULL,
ac_inactiv bit NOT NULL,
ac_notes text NOT NULL,
timestamp_column timestamp)
/* Index code */
CREATE INDEX ac_id ON account (ac_id)
CREATE INDEX ac_account ON account (ac_account)
CREATE INDEX uac_name ON account (ac_name)
/* Default code */
sp_bindefault UW_ZeroDefault, 'account.ac_inactiv'
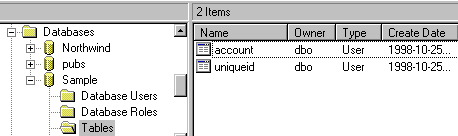
This script is not executable in SQL Server directly. It was constructed during the upsizing process, but does not represent the entire sequence of steps that the wizard performed. Once we have completed the upsizing process, we would probably use the tools that come with SQL Server itself to generate a script to reconstruct the database. You can see from this script one interesting distinction between SQL Server and FoxPro already: a default value of 0 is being assigned to the logical field. Logical values in SQL ServerLogical values in SQL Server are not allowed to hold null values, but must be 0 or 1. (Yes, that's right – not "true" and "false", but a 0/1 flag.) VFP allows null values for logical fields. To manage this difference, the upsizing wizard automatically creates and binds a default value of 0 to each logical field. In other words, if you don't specify an initial value for logical fields when TABLEUPDATEing, a value of 0 rather than null will be assigned the logical field. Default values, nulls, and the SQL Server ODBC driverDefault values behave differently in SQL Server than in FoxPro. In FoxPro, default values appear as you add a new record. In SQL Server, default values only appear after a record has been inserted. Coupled with a "feature" of the ODBC driver, this can have a MAJOR impact on your application: If a field in the SQL Server table are marked NOT NULL, and you do not specify an explicit value for the field in the INSERT statement, then the ODBC driver will attempt to insert NULL into the field by default. This will cause an error that your application will need to deal with. As a rule, then, either: Ensure fields that will not be provided with initial values in INSERT statements be marked nullable, or: Always specify initial values for all fields in your INSERT statements. Indexes on DELETED()If you have any indexes on DELETED(), (which experts recommend for Foxpro systems) then these will show up as errors in the error_uw table produced by the Upsizing Wizard. SQL Server does not have any equivalent to the DELETED() function. When you delete a record, it really is deleted, and you can't RECALL it. Consequently this error is not a problem and the lack of an index on DELETED() in SQL Server isn't the performance issue it would be in VFP either. Checking out the new tables in SQL ServerIf we now run the Enterprise Manager, we can drill down into the tree and see the newly created tables (See figure 26).
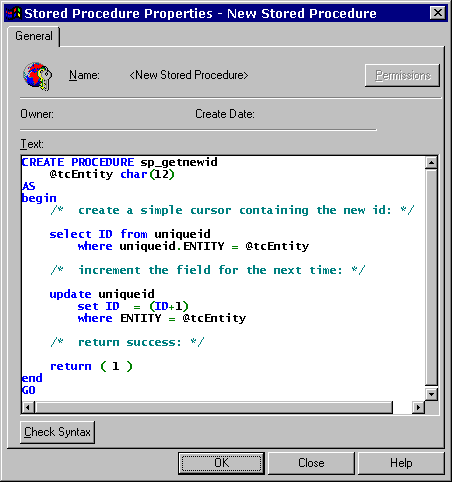
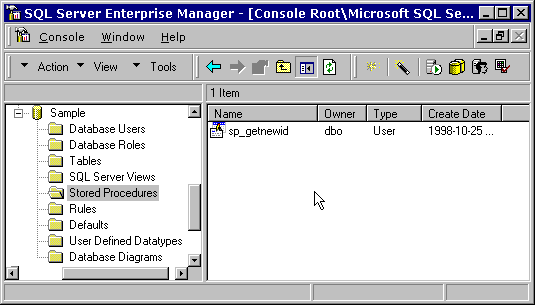
Figure 26. The newly upsized tables Handling unique ID generation in SQL ServerI'm sure there is more than one way to generate unique values for primary key fields in SQL Server. For a start, SQL Server tables support something called "identity columns", which are columns that contain automatically incremented integer values as records are created. If you have a database schema for your application that uses integer primary keys, then you could probably use identity columns. But if your primary keys have other requirements, then identity columns may not be appropriate, in which case you would have to find another mechanism. The Upsizing Wizard does support identity columns – see figure 21 – but if you place a tick in the Indentity Column checkbox, it will create a field called, identity_column in your upsized table structure in addition to all the other fields in your table. I'm not sure how useful this is, without additional supporting logic. After all, your original database structure probably had functional primary and foreign keys. Perhaps it would be more useful if the wizard had actually changed selected primary key fields to identity columns rather than adding a new one, although that may not be possible. In our simple example, the account table does in fact have integer primary keys, but to make things more interesting we won't use identity columns – we'll use a similar mechanism to what we're using in the local view/VFP data situation (See the section on L_Sample.dbc above). In our local view DBC we have a stored procedure, sp_GetNewId(), which uses the uniqueid table. The very nature of stored procedures requires them to be database platform-specific. In the case of sp_GetNewId(), the procedure has to be split into two parts: one part executes on SQL Server, and the other executes in the FoxPro application. Creating a stored procedure in SQL ServerWe need to drill down to the Databases\Sample\Stored Procedures branch in Enterprise Manager, and right-click in the right-hand pane of the window to select New Stored Procedure… This will display the New Stored Procedure dialog (Figure 27).
Figure 27. New Stored Procedure in SQL Server We can now type in the SQL script to create the stored procedure… CREATE PROCEDURE sp_getnewid
@tcEntity char(12)
AS
begin
/* create a simple cursor containing the new id: */
select ID from uniqueid
where uniqueid.ENTITY = @tcEntity
/* increment the field for the next time: */
update uniqueid
set ID = (ID+1)
where ENTITY = @tcEntity
/* return success: */
return ( 1 )
end
…and press the OK button. The new procedure should now appear in the Enterprise Manager window (Figure 28).
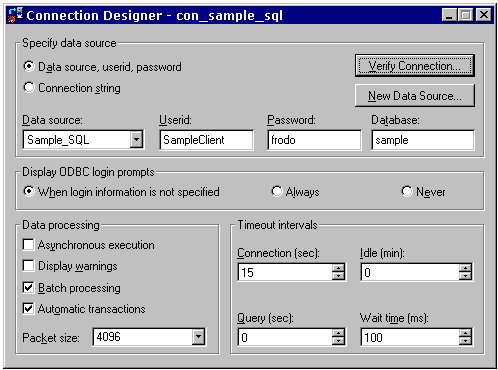
Figure 28. The new stored procedure sp_GetNewId(). R_SAMPLE, the remote view DBCNow that we have our sample data in a SQL Server database, we can create an alternative DBC (R_Sample.dbc) with local views that our applicaton can use. The remote views will have exactly the same name as those in the local view version, L_Sample.dbc, and contain identically-named stored procedures. So, it's back to VFP for this: create database r_sample Creating a connection definition in the databaseIn order to prevent repeated prompting for LoginID and passwords by the SQL Server ODBC driver, we can store this information in the VFP database as a connection. We can then create our remote views to reference the connection definition: Earlier we created a special LoginID in SQL Server for our application – this is where we get to use it: create connection con_sample_sql ; datasource "Sample_SQL" ; userid "SampleClient" ; password "frodo" ; database "sample" Note: You must use proper case when specifying the datasource name in this command. If you don't get it exactly right – including the exact case of each letter – the connection will end up using the wrong data source. If this is the first time you are creating a connection definition, it is a good idea to MODIFY DATABASE and check the connection (See figure 29).
Figure 29. Verifying the connection settings Another way of testing the connection might be to actually use it: ? sqlconnect('con_sample_sql')
7
? sqlexec(7,'select * from account')
-1
=aerror(x)
? x[1,2]
Connectivity error: [Microsoft][ODBC SQL Server Driver]
[SQL Server]SELECT permission denied on object 'account',
database 'Sample', owner 'dbo'.
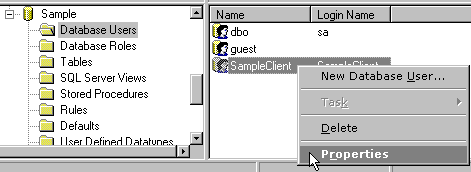
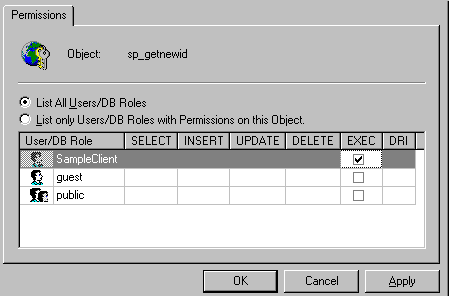
…Uh oh. Have we forgotten something? Assigning permissions to the UserID in SQL ServerYes, indeed, a very important step is to ensure that the SampleClient UserId has sufficient rights to read and/or write data to the tables in the sample database. This is done (you guessed it) in the Enterprise Manager.
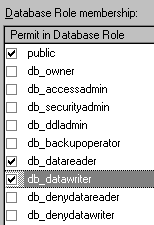
Figure 30. Setting properties of a UserID Drill down to the Databases\Sample\Database Users branch of the tree and right-click the SampleClient UserID and select Properties (See figure 30). This will display the Database User ID Properties dialog. What we need to do is add SampleClient to the db_datawriter and db_datareader roles. Assigning these Roles in this way appears to be new in SQL Server 7.0, and is a handy way of defining sets of access permissions to individual users. (Many of us have been implementing role-based application security models for a while now, and it is good to see this exposed like this in SQL Server 7.0.)
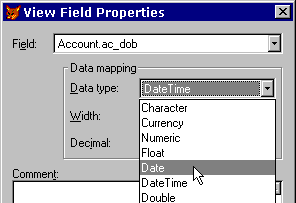
Figure 31/31a. Assigning roles and execute rights to the UserID We add the user id to each role by placing a tick in the checkboxes against db_datawriter and db_datareader. Once we have saved the changes we can retest the connection, and this time it will work. We also need to assign Execute rights on the sp_GetNewId stored procedure to the SampleClient UserId, otherwise our application won't be able to call it! Creating the remote viewsNow we can create the remote views we need: open database r_sample create sql view account_rec remote ; connection con_sample_sql share ; as ; select * from account where account.ac_id = ?ipvAC_ID create sql view account_lst remote ; connection con_sample_sql share ; as ; select ac_id, ac_account from account order by ac_account Although I've shown the code to create the views here, we probably would normally use the view designer to create the view, because we still have to set the key field and update criteria of the view (as shown in figure 3 earlier), and it is easier to use the View Designer to set the key fields and updateable fields. You can use the DBSETPROP() function to do this programmatically, and I've included examples of this in Appendix A. Sharing connectionsYou will notice that I created the views with a SHARED clause. This causes the views to share existing connections with the server, rather than create their own. Experts highly recommend doing this, as it is faster and more efficient on the server end to share a connection that is currently open. More on this later. Let's see if the views work: open data r_sample ipvAC_ID = 2 use account_rec edit noedit The browse window certainly has data in it. We can tell it is from the SQL Server database, because it has an extra field TIMESTAMP_COLUMN (which we talked about earlier) and the AC_DOB field is now of type DATETIME. This will cause problems with our application unless we can do something about it. We do not want users of remote data having to edit DATETIME values instead of DATE values, or to have to handle this differently on the client application. Introducing data mappingEven though SQL Server does not have a DATE data type, we can get around this problem by using a great feature of remote views called data mapping. The view designer has a Properties… button on the Fields tab that brings up a dialog where you can set various properties for each field – one of which is the data type of the field. Figure 32 illustrates changing the type of the AC_DOB field from DATETIME to DATE. In VFP 6.0, the new Upsizing Wizard will do this data type conversion for us automatically, marking fields that were originally DATE in the VFP database (but must be DATETIME in SQL Server) as DATE again in the remote views. If you encountered this problem in 5.0, you can be sure that it won't happen in 6.0. If you haven't yet experimented with upsizing and are about to start in 6, you probably won't have this problem.
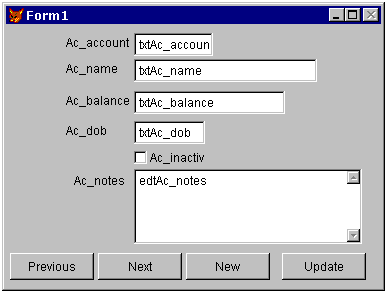
Figure 32. Changing the data type of a remote view field Remote stored proceduresThe last part of constructing the remote view database R_Sample.dbc is writing the stored procedures. If you remember, we made a decision to use identically named stored procedures in each of the two DBCs, one set for remote data and one for local. These stored procedures support the ability of our application to use the two view DBCs interchangeably without any special application code, because all of the platform-specific code has been isolated into stored procedures. Well, we have a generic, pre-written set of basic stored procedures for both local and remote DBCs. See sample\sp\remote.prg for the source code of the remote stored procedures used in R_Sample.dbc. You already know about sp_GetNewId(), but you may be wondering what other functions might be needed? Perhaps the easiest way to illustrate them is to go through the remote DBC implementation of sp_GetNewID(): sp_GetNewId() has to return the next available unique id for a specific key series, by executing a stored procedure in the SQL Server database. Why are we moving the GetNewId code into a SQL Server stored procedure? Because we need it to be as fast and as multi-user safe as possible, and the best place for that is in the SQL Server database itself. We then write a wrapper procedure in the R_SAMPLE dbc that calls the SQL Server one. In order to directly execute a stored procedure on the SQL Server database, we have to use SQLEXEC(), which requires a connection handle, normally returned by the VFP function SQLCONNECT(). We wrote a procedure called sp_GetAvailableConnectionHandle() that would look for a currently open view and "borrow" its connection handle, using CURSORGETPROP(). We ended up using code like the following example in many places: lhConnection = sp_GetAvailableConnectionHandle() if m.lhConnection > 0 llCloseConnection = .F. else lhConnection = sp_GetNewConnectionHandle() llCloseConnection = (m.lhConnection > 0) endif if m.lhConnection > 0 *// do something here... if m.llCloseConnection =SQLDisconnect( m.lhConnection ) endif endif (A complete list of the basic stored procedures and comments on their relative implementations can be found in Appendix B.) Building an example applicationWe're going to base our example application around a simple editing form. Defining a basic editing formLet’s define a really simple main form for our application – we’ll use a single-record layout with next, previous, and new buttons, and an update button to save any changes. This will do to start with, anyway.
Our form now looks like that shown in figure 33.
Figure 33. The basic UI for our main form Finding the appropriate dataAs this form is going to work transparently on both local and remote data, the first step is to ensure that the appropriate database is opened, and that the cursor objects in the Data Environment point to it. We can do this by adding code to the Data Environment's .BeforeOpenTables() event. To keep things simple, at this point we're going to add some "demo-only" code that asks which DBC – local or remote – the form should use: *// Choose remote or local data:
if IDYES=messagebox('Do you want to edit REMOTE data?',;
MB_YESNO+MB_ICONQUESTION)
lcDBC = 'data\r_sample.dbc'
else
lcDBC = 'data\l_sample.dbc'
set path to data\ && not needed for remote
endif
(Normally we would read settings from an INI file or application object properties or whatever.) Once we've figured out which DBC we're using, we can make sure it is open, and loop through the cursor objects in the data environment, setting the value of their .Database property appropriately: *// Ensure the database is open:
if not dbused( m.lcDBC )
open database (m.lcDBC)
else
set database to (m.lcDBC)
endif
*// Set the appropriate database for each cursor object:
local array laMembers[1]
liCount = amembers(laMembers, THIS, 2)
for each lcCursorName in laMembers
loMember = eval('THIS.'+lcCursorName)
if upper(loMember.Baseclass) = "CURSOR"
loMember.Database = m.lcDBC
endif
endfor
Placing code in the formLet’s complete the form by placing code: Init()*// Placeholder – pick an initial record:
ipvAC_ID = 1
=Requery('account_rec')
*// Use the form caption to indicate which DBC we're using:
THIS.Caption = sp_GetDBType()
cmdUpdate.Click()*// If you get "connection is busy" errors,
*// check the connection with the stored procedure:
* sp_WaitWhileConnectionBusy( 'account_rec' )
if not TableUpdate( TABLEUPDATE_CURRENTROW, ;
TABLEUPDATE_SKIPCONFLICTS, ;
'account_rec' )
=TableRevert( TABLEREVERT_CURRENTROW )
if messagebox('Your changes were not able to be saved.'+;
' Would you like to see the latest data?', ;
MB_YESNO+MB_ICONQUESTION)=IDYES
*// Requery the view:
ipvAC_ID = account_rec.AC_ID
=requery('account_rec')
THISFORM.Refresh()
endif
else
=messagebox('Your changes have been committed.',;
MB_ICONINFORMATION)
endif
cmdNext.Click()*// Use sp_SQLExecute() to obtain the previous id:
local lcSQL
lcSQL = "select top 1 AC_ID from account"
lcSQL = lcSQL + " where account.AC_ID > "+trans(account_rec.AC_ID)
lcSQL = lcSQL + " order by 1 "
if sp_SQLExecute( m.lcSQL, 'csrResult') > 0
local ipvAC_ID
ipvAC_ID = csrResult.AC_ID
use in csrResult
=requery('account_rec')
THISFORM.Refresh()
endif
cmdPrevious.Click()*// Use sp_SQLExecute() to obtain the previous id: local lcSQL lcSQL = "select top 1 AC_ID from account" lcSQL = lcSQL + " where account.AC_ID < "+trans(account_rec.AC_ID) lcSQL = lcSQL + " order by 1 desc" (sp_SQLExecute() as above...) cmdNew.Click() insert into account_Rec ;
( ac_id ) ;
values ;
( sp_GetNewId('account') )
THISFORM.Refresh()
…and that's it. We can now save the form (say, as ACCOUNT.SCX) and run it. You can run it several times, on both remote and local data, and observe how the inserting, buffering and conflict resolution all work the same way. Looking at potential problems and how we solve themWe could enhance our form a little by getting it to prompt us for an account record to edit. Let's use the account_lst view in a chooser dialog:
release THISFORM
Now let's link in the chooser form with our edit form:
	do form chooser
	ipvAC_ID = account_lst.AC_ID	&& pick up the current record
	=Requery('account_rec')
	THISFORM.Refresh()
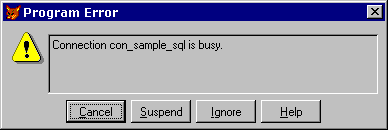
That should do the trick. Let's run the form and see what happens… Hey! What gives? We get the errror shown in figure 34.
Figure 34. The "busy connection" error What happens is that we get a "busy connection" error on the REQUERY() in the form's .Init(). Why is the connection suddenly busy? The answer is that the account_lst view that we added to the form's Data Environment was not marked "NoDataOnLoad", and so was still busy retrieving records from SQL Server in the background while our form's code continued executing. When the form got to the REQUERY() in the Init event, the error occurred because REQUERY() needed to use the connection. A "trivial" solutionIf we mark the account_lst object in the Data Environment for NoDataOnLoad, then we will have to also add a =Requery('account_lst') in the Choose button .Click() event, otherwise the list will be empty and we won't be able to select any records to edit! Rather than applying this "trivial" solution to the problem, let's investigate our options in this sort of situation. But wait a minute - didn't we create a synchronous connection?If you take a flash-back to figure 29, you may recall that when we created the con_sample_sql connection in the remote R_SAMPLE.DBC, the connection setting "Asynchronous execution" was not checked. So why did our code continue executing while data was being retrieved? Doesn't "synchronous" mean Foxpro won't execute the next line of code until the view has finished loading? The confusion arises because that "asynchronous" connection setting does not mean what we think. The "Asynchronous execution" checkbox is the same as SQLSETPROP(hConn,'Asynchronous'), which only controls the execution mode of queries initiated with SQLEXEC(), not views in general. The bottom line here is: Our application code must always pay attention to the possibility of busy connections. Handling busy connectionsDuring development of the VM application, we got the "connection is busy" error quite a bit until we fine-tuned our advanced view settings, and strategically placed calls to a VFP stored procedure we wrote called sp_WaitWhileConnectionBusy(). This procedure prevents the error from triggering the error handler (and halting our application) by looping, polling the connection's busy state, and returning control to the calling program when the connection is free. It uses VFP's SQLGETPROP(h, 'ConnectBusy') function. Let's use it here, to illustrate how it works: *// Placeholder – pick an initial record:
ipvAC_ID = 1
sp_WaitWhileConnectionBusy('account_rec')
=Requery('account_rec')
*// Use the form caption to indicate which DBC we're using:
THIS.Caption = sp_GetDBType()
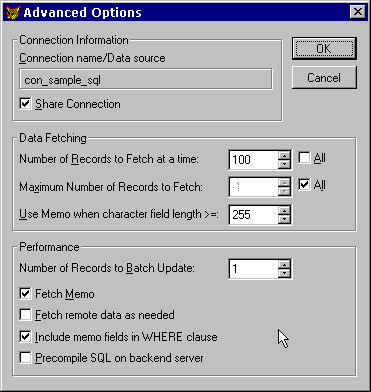
Now, when we run the form this time, the sp_WaitWhileConnectionBusy() stored procedure loops until the connection is free, displaying a "Connection is busy. Retrying…" message in the right-hand corner of the screen. A short time later, the form comes up, ready for editing. This is all very well: we no longer get the error, but why does it take so long to load? The answer can be found in the Advanced View Options dialog. This dialog is well-hidden; I keep forgetting that it exists, but it is actually very important. Let's modify the account_lst view, and display the dialog by selecting Advanced Options… from the Query menu, when the View Designer is active.
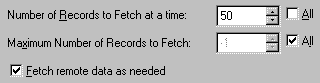
Figure 35. The Advanced View Options dialog Figure 35 shows the advanced view parameters as set by VFP's defaults.[5] Our account_lst view has data-fetching parameters set to retrieve records from the server in batches of 100, until all records are fetched. So the 500 records in our ACCOUNT table were loaded into the view in 5 separate hits. Let's try adjusting these fetch settings so that things work better. Setting max number of records to fetchIf we change this from "all" to, say, 100, then we only ever get the first 100 records in the account_lst view. Things are faster, yes, but we don't ever get to select from all the records in the table! Setting number of records to fetch to AllLet's place a tick in the "All" checkbox against "Number of records to fetch at a time", save the view, and run our form again. Now the form gets up and running for editing much faster! This is great! We get all 500 records in one load, and it doesn't appear that the connection is busy for long enough to matter. But what happens when the ACCOUNT table has not 500 records, but 500,000? 5 million? Is it going to slow down again? The answer is yes, and the actual performance you get may vary due to a number of factors, like load on the server, number of simultaneous users, etc. Basically, if your table contains too many records for this setting to work adequately, then we have to try something different. Using progressive fetching"Progressive Fetching" is where the view only retrieves a limited number of records, and then waits until you or the application requires additional records to be fetched – and then fetches them. We can see this in action by:
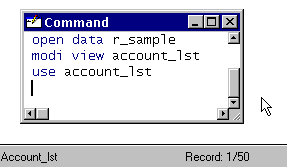
Figure 36. Settings for Progressive fetching To see progressive fetching in action, we can change the settings for account_lst to those shown in Figure 36, and execute the following commands: set database to r_sample use account_lst browse Take a look at the status bar (See figure 37).
Figure 37. Progressive fetching in action It shows 50 records in the view cursor. Now page down in the browse window a couple of times, and you'll see the record count jump from 50 to 100.
This is cool! The view is only bringing down the records it needs in order to fulfil the commands we demand of it. Be warned, however, that some commands will bypass progressive fetching, and demand that the full set of records are retrieved in one go:
Let's try running our ACCOUNT.SCX form, on remote data, with progressive fetching enabled. Immediately, we hit a problem. You will notice that the form never completes loading: our "Connection busy" trap message just stays up continously. We have to cancel by pressing Escape. Why? It turns out that enabling progressive fetching has a fairly major side effect: it keeps the connection "busy" until the entire record set has been retrieved. As progressive fetching delays this until absolutely necessary, the connection is busy indefinitely. The only way to retain the advantage of progressive fetching but allow our application to continue using other views is to give each view that needs progressive fetching its own connection. This is done in the Advanced View Options dialog (see figure 35) by clearing the checkmark from the "Share connection" checkbox. Obviously, we've found another couple of guidelines for our application development strategy:
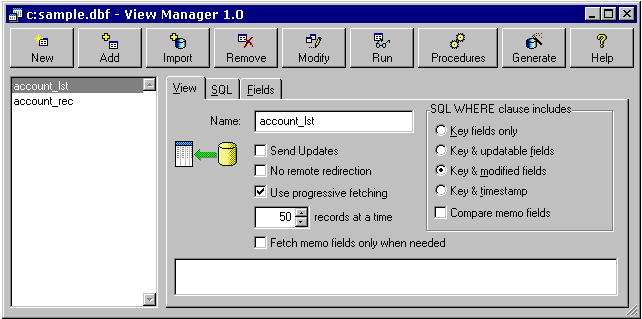
So: let's alter the account_lst view so that it does not share its connection, and then try running our ACCOUNT.SCX form on remote data, and see what happens: Everything appears fine: the form loads in a reasonable time; the chooser dialog shows records from the account_lst view… hang on: there are only 50 records in the listbox! Yet another stupid problemThis turns out not to be a problem with progressive fetching as such, but more of a case of the listbox control not quite working with progressively fetched views. As you scroll to the bottom of the record set, the listbox does not demand that the view retrieves more records. We only ever get the first 50 (or whatever the fetch size has been set to). The solution here is to use a grid control instead of a listbox. The grid works more like a browse in that when you scroll down the records, the underlying view automatically retrieves more records as required. Introducing the View Manager utilityIn the source code delivered with this session, I have included a utility I wrote during the vertical market development project. I call the utility "View Manager", because it maintains a list of view definitions independent from any DBC, and allows you to generate DBCs containing local and remote versions of the views. (See Figure 38.) Download a zip file containing vm.exe, documentation and source code. Why might you want to use View Manager?Some of the deficiencies of the upsizing wizard and the view designer in particular I have discussed in the session notes above, but there are additional reasons that a separate tool to edit view definitions and generate DBCs might be a good idea:
Figure 38. View Manager in action DrawbacksThere is one drawback: in its current version, View Manager only supports one named connection definition in the remote DBC. This hasn't been a problem for me, but could potentially be a problem in the future. DocumentationI have included a fairly detailed help file for View Manager in HTML format with the session files - try opening vm\docs\default.htm. …query completed.I have covered most of the issues I wanted to discuss in enough detail in these notes. I have a feeling that I will run out of time in my sessions and not manage to cover everything, but at least the information is in these notes somewhere. I hope you enjoy reading them, and that you find something of value that interests you, or even better, helps you in your VFP development projects. See you on the web, - Colin You can obtain the associated files referenced in this article here. [1] This is the only guideline that I would revise if I were to work on a similar project today. [2] Sauron was the chief bad guy in JRR Tolkien's fantasy novel "Lord Of The Rings". He lived in "Barad-dur, the Dark Tower". My computer is beige, but has delusions of grandeur. [3] Frodo was the main good guy in Tolkien's "Lord of the Rings". [4] It is quite possible that there is a performance difference here. Using the explicit server name might involve an extra level of translation or lookup, or it might work the other way. But if you are suffering performance problems working on the same physical machine as the SQL Server, then most likely there are other reasons for the problem! [5] Run VFP6.EXE –A to suppress reading the registry and configuration files, and then look at Tools:Options:Remote Data. You'll see these default settings. Every time you create a remote view, the advanced settings are defaulted in from these values, with the exception of Share Connection. For some reason, new remote views are never marked as "share connection", despite setting this checkbox in Tools:Options. I think this is an "infelicity". |